Key takeaways
- For the refrigerator, measure the narrowest point between the shelf supports. If you like to store a stack of three filled containers, check the height of that stack with the lids closed. Leave enough room to pull a container out without lifting the shelf above it.
- For a lunch bag, measure the inside width with the ice pack or drink in place. Check the width across the latches, which can extend beyond the lid. If the bag has a small opening, measure that opening too. A container can fit the bottom of the bag and still be difficult to slide through the zipper.
- For the dishwasher, picture the lid on the rack recommended by the manufacturer. A lid that fits there with the latches open is easier to wash alongside your normal dishes. If you will wash by hand, check whether a brush can reach the underside of the lid where it meets the rim.
- For a pantry, measure the height with the lid closed and the space you need to open it or lift it off. A canister that fits tightly under a shelf may have to come out every time you scoop flour. If you refill it from a bag, compare the opening with your scoop or funnel.
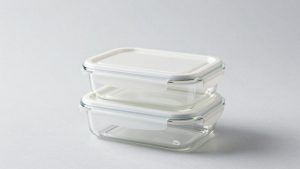
Choose BPA free plastic food storage containers by matching the lid, capacity, and care instructions to the food you actually pack. Look for a leakproof claim if you carry soup, a freezer-use rating for batch cooking, and separate microwave instructions for the base and lid if you reheat lunch at work.
What to look for in BPA free plastic food storage containers
Start with the manufacturer’s listing for the exact set, then check the use and care instructions for its base and lid. A good fit for everyday leftovers may be a poor fit for soup on a commute, and a pantry canister can have the right capacity while being too tall for the shelf where you plan to keep it.
| Main use | What to verify | Trade-off |
|---|---|---|
| Soup or saucy lunches in a bag | Explicit leakproof claim for the assembled container, intact gasket, secure closure | Gaskets and latches add surfaces to wash and dry |
| Leftovers for microwave reheating | Base marked microwave-safe, directions for lid removal or venting, food restrictions | You may need to transfer some meals to a separate dish |
| Batch portions in the freezer | Freezer-use rating, room for expansion, stackable footprint | A wide, shallow base takes more shelf area |
| Flour, cereal, or snacks | Airtight closure, opening wide enough for a scoop, clearance under the shelf above | Tall canisters can be awkward to lift or refill on a high shelf |
| Several identical lunches | Enough same-size bases with interchangeable lids within the set | Mixed-size sets offer more flexibility for leftovers and sides |
How to verify BPA free plastic food storage containers
Look for an explicit BPA-free statement on the packaging or product page for the exact set. Check whether that statement covers the assembled container if the listing describes only the base. The base, lid, gasket, and latch can use different materials, so the clear bottom tells you little about the lid.
BPA stands for bisphenol A. The FDA identifies it as a component used in certain polycarbonate plastics and can linings. The agency’s published position is that the evidence supports the safety of currently approved food-contact uses of BPA. If you’re shopping to avoid BPA, use the manufacturer’s statement to check that preference. Look for the intended food-contact and use conditions separately.
A recycling number identifies a resin category. The FDA notes that a number 7 marking can indicate a plastic that may contain BPA, so the number alone cannot settle whether a particular container meets your preference. Clear and cloudy plastics can both be sold as BPA-free. When an online listing uses a photo of a generic box, look for a model number, a packaging photo showing the claim, or written confirmation for the actual set before ordering.
Match the shape and capacity to your meals
Measure your usual serving in a kitchen measuring cup, then compare that volume with the set’s capacity list. Check the outside measurements with the lid attached as well. The right container has space to close cleanly and fits where you’ll carry, chill, or store it without wasting a shelf or lunch bag.
Choose shallow bases for wide meals
A shallow rectangular base works well for a sandwich, sliced chicken with rice, or a salad that you want to toss before eating. Check the dimensions at the bottom of the container as well as at the rim. Tapered walls make some bases easy to nest, but they can leave less room for flat food than the lid width suggests.
For a sandwich, measure the bread or roll against the interior floor. For a bowl meal, measure the full portion once the toppings have been added. If you usually fill a bowl with two cups of food, a container that holds exactly two cups to the rim leaves little room to mix the meal or keep the rim clear for closing. A larger base gives you working space. Carry dressing separately if you want leafy greens to stay crisp.
Divided bases suit meals you want to serve as assembled portions. If a listing shows a divider, check whether the lid seals against it. A low partition can keep crackers apart from cheese while the box sits flat, yet allow dressing to cross over when you tip the box on its side.
Count bases and lids before buying a set
Read the contents list and count the actual bases at the sizes you use most. A set advertised by total piece count can include a separate piece for every lid. For a weekly lunch routine, five compatible bases and five matching lids cover five meals, even if a mixed bundle advertises a higher piece count.
Rubbermaid’s listed 20-piece Brilliance plastic set illustrates the difference. It contains ten bases with lids, including four half-cup bases, two 1.3-cup bases, one 3.2-cup base, two 4.7-cup bases, and one 9.6-cup base. The half-cup containers have a clear role if you routinely pack dips or toppings. If your main goal is five meals of the same size, count how many bases in that bundle would take your full portion. A smaller bundle with more of the right size may be the better purchase.
Measure the spot where the set will live with the door closed. Refrigerator shelf rails and freezer drawer handles can reduce the usable space. For cabinets, check whether empty bases nest and where the lids go. For filled containers, check whether the lid design lets you stack them without covering a latch you need to release.
Decide how much sealing you need
Choose the lid for the way you move the container. A dry snack on a pantry shelf has different needs from a bowl of soup that may ride sideways in a backpack. Look for the manufacturer’s leakproof claim and any restrictions on orientation before deciding whether you need a gasketed, locking lid for every size.
Check the seal for liquids and commutes
An airtight claim tells you the closure is designed to limit air exchange. For soup, broth, or a thin dressing carried in a bag, look for an explicit leakproof claim for the exact assembled model. Check that the gasket sits evenly in its channel and that any vent is in its closed position before packing.
If the manufacturer allows the container to be carried on its side, you can check your new unit with cold water over the sink before packing a meal. Close the lid according to the instructions, wipe the outside dry, and tip it briefly. Look for moisture along the rim and around any vent. This checks the fit of your particular lid when new. Repeat after reseating the gasket if the manufacturer permits removal. Replace a closure that no longer holds securely.
For kids or anyone with limited hand strength, try opening the actual latch design if you can. A tight clasp that keeps soup contained can be frustrating when the person eating lunch needs to open it without help. A simpler closure can work well for dry snacks or food that stays upright in the refrigerator.
Check how the lid comes apart for washing
Before buying a gasketed set, find the care directions for the lid. Look for instructions on whether the gasket can be removed and whether the lid has a dishwasher rack restriction. If the seal stays in place by design, check that you can reach the channel with ordinary washing tools and air-dry the lid fully.
If you frequently pack tomato sauce or thick dressings, pay particular attention to corners, underside ribs, and the track where the gasket meets the lid. Use the manufacturer’s cleaning method for those surfaces. If a gasket is removable, note which side faces out so it goes back in the same way. Let washed components dry before you assemble the set for cabinet storage.
Look up replacement lids by model and size if you expect to keep the bases for years. Matching capacity and shape in a listing can still leave you with a different rim profile. If replacement lids are unavailable, a modular set with interchangeable lids gives you more flexibility when one goes missing.
Read the microwave and freezer instructions
Use the care instructions for the exact product you plan to buy. Food storage, microwave reheating, freezer use, and dishwasher cleaning are distinct conditions. The base can be suitable for a task while the lid requires a different position, a different cleaning method, or removal before you start.
Choose a container for microwave reheating
USDA advises using only containers labeled microwave-safe for microwave use. Check the base marking and read what the manufacturer says to do with the lid. A vented design may have a specific latch position, while another container may require you to remove the lid entirely and use a suitable cover.
Rubbermaid Brilliance plastic containers illustrate how specific the instructions can be. The brand directs users to open the latches for steam to escape during microwave reheating and says the containers are for reheating precooked foods. Its care guide also advises against reheating foods high in salt, oil, fat, or sugar in those containers. If you’re shopping for a dish that often holds buttery pasta, syrup, or an oily sauce, factor those directions into the purchase. A separate microwave-safe dish can handle the reheating when the storage container’s instructions exclude the food.
Check the external dimensions against your microwave, especially if you are using a compact unit at work. Make sure the container can rotate freely on the turntable. A set can fit your lunch bag and still be too wide to rotate in the microwave you use every day.
Leave space for expansion in the freezer
Choose a freezer-rated base and lid for batch cooking, then follow any fill line or headspace instructions. For broth and other water-rich foods, room at the top matters because the contents expand as they freeze. A container filled to the rim can put pressure on the lid or sides as the food freezes.
For a meal you expect to defrost one serving at a time, portion it before freezing so you can pull out what you need. Pick a shape that stacks on a flat freezer shelf and lets you write a meal name and date where you can see them. Containers in a deep drawer are often easier to identify with a label on top, while shelf stacks are easier to scan when the labels face outward.
Inspect the base and rim after a frozen container has been dropped. Rubbermaid’s care instructions for Brilliance explain that plastic is less flexible when frozen and can break on impact. If a crack or distorted rim interferes with the seal, replace the affected component. Check the directions again if you intend to defrost the food in the microwave because the freezer rating applies to the cold-storage step.
Spend on the pieces you will use
Compare the total checkout cost against the number of bases that fit your portions and routine. If you mostly store leftovers at home, a simple set in two useful sizes may cover dinner portions and small sides. If you commute with liquids, put more of the budget toward lids that close securely and clean easily.
One way to compare sets is to count everyday containers first, then divide the price by that count. In a hypothetical comparison, a $24 set with four bases that suit your lunch costs $6 per useful lunch base. A $20 set with two suitable bases costs $10 per useful lunch base. Give the other pieces credit if you have an actual job for them, such as half-cup portions of dressing or a large base for sharing a salad. These figures are an example of the calculation.
Start with a small quantity if the listing omits a dimension or the opening force is hard to judge. After a few normal uses, you can tell whether the container fits the bag, comes clean in your dishwasher, and holds the serving you intended to pack. Add the same size once you know which one you consistently reach for. If you’re replacing old plastic storage, inventory lids and bases separately so you can see whether replacing a few lids solves the actual storage problem.
For a household that mixes pantry storage, meal prep, and leftovers, decide which jobs can share a lid or footprint. Pantry canisters benefit from a wide mouth and a shape that makes ingredients easy to pour or scoop. Lunch containers benefit from portability and an easy-open closure. Buy both styles only when your current containers leave a clear gap in each job.
Check the set before you commit
Use the same checks when you compare listings online or inspect a set at a store. Write down the dimensions you have available, how many meals you pack, and which parts need to go in the dishwasher. That short list makes it easier to spot a bundle that looks useful in photos but has the wrong mix of sizes.
- For the refrigerator, measure the narrowest point between the shelf supports. If you like to store a stack of three filled containers, check the height of that stack with the lids closed. Leave enough room to pull a container out without lifting the shelf above it.
- For a lunch bag, measure the inside width with the ice pack or drink in place. Check the width across the latches, which can extend beyond the lid. If the bag has a small opening, measure that opening too. A container can fit the bottom of the bag and still be difficult to slide through the zipper.
- For the dishwasher, picture the lid on the rack recommended by the manufacturer. A lid that fits there with the latches open is easier to wash alongside your normal dishes. If you will wash by hand, check whether a brush can reach the underside of the lid where it meets the rim.
- For a pantry, measure the height with the lid closed and the space you need to open it or lift it off. A canister that fits tightly under a shelf may have to come out every time you scoop flour. If you refill it from a bag, compare the opening with your scoop or funnel.
When deciding between two sets, pick the one that handles the task you perform most often without adding a recurring chore. A five-lunch routine benefits from matching lids that can be grabbed in any order. A freezer routine benefits from labels that are easy to read with the containers stacked. A mixed-size set makes sense when you can name a regular job for each size and have room to keep the lids organized.
Conclusion
Buy the set that fits your usual portion and the place you will store or carry it. Confirm the BPA-free claim for the exact set, choose an explicit leakproof closure for liquids on the move, and read the base and lid directions before freezing, microwaving, or washing. Count the useful bases before comparing prices.
More from Amazon
Programs that pair well with the guide above. Offers and eligibility are set by Amazon and may change.
Set up recurring deliveries of everyday items on eligible products. Terms and savings are set by Amazon.
Explore Subscribe & SaveCollect the home and kitchen items you want in one registry that guests can shop from.
Create a wedding registryFree shipping on eligible items, Prime Video and more. Eligible new members can start with a free trial.
Start a Prime free trialAudiobooks and podcasts to listen to on the go. Eligible new members can start with a free trial.
Try Audible freeAs an Amazon Associate we earn from qualifying purchases.